Understanding a ceiling fan electrical wiring diagram is essential for anyone looking to install or troubleshoot a ceiling fan. This article will guide you through the various components, wiring configurations, and safety considerations involved in ceiling fan installation. By the end, you will have a comprehensive understanding of how to read and interpret these diagrams, ensuring a successful installation or repair. Whether you are a homeowner looking to enhance your living space or a DIY enthusiast eager to learn more about electrical systems, this guide will provide valuable insights.
Table of Contents
What is a Ceiling Fan Electrical Wiring Diagram?
A ceiling fan electrical wiring diagram is a visual representation that illustrates how the electrical components of a ceiling fan are connected. It typically includes the fan motor, light kit, switches, and power supply. These diagrams are crucial for both DIY enthusiasts and professional electricians, as they provide a clear roadmap for wiring the fan correctly. Understanding these diagrams can prevent common mistakes that may lead to malfunctioning fans or even electrical hazards. By familiarizing yourself with the layout and symbols used in these diagrams, you can approach your ceiling fan project with confidence.
Components of a Ceiling Fan Wiring Diagram
To fully grasp a ceiling fan wiring diagram, it is important to understand the key components involved. Each part plays a vital role in the fan’s operation and overall functionality.
1. Fan Motor: The heart of the ceiling fan, responsible for spinning the blades and creating airflow. The motor’s efficiency directly affects the fan’s performance, including its speed and noise level. Different motors may have varying power ratings, which can influence the fan’s energy consumption.
2. Light Kit: An optional component that provides illumination. It can be wired separately from the fan motor, allowing for independent control. Light kits come in various styles and wattages, enabling homeowners to customize their lighting according to their needs and preferences.
3. Switches: These control the operation of the fan and light. Depending on the setup, there may be one or multiple switches. Understanding how to wire these switches correctly is crucial for ensuring that the fan and light operate as intended.
4. Power Supply: The source of electricity, typically coming from the ceiling junction box. The power supply must be adequate to support the fan and any additional components, such as a light kit. Properly connecting the power supply is essential for safe and efficient operation.
Common Wiring Configurations
Ceiling fans can be wired in several configurations, depending on the number of switches and the presence of a light kit. Here are some common setups that you might encounter:
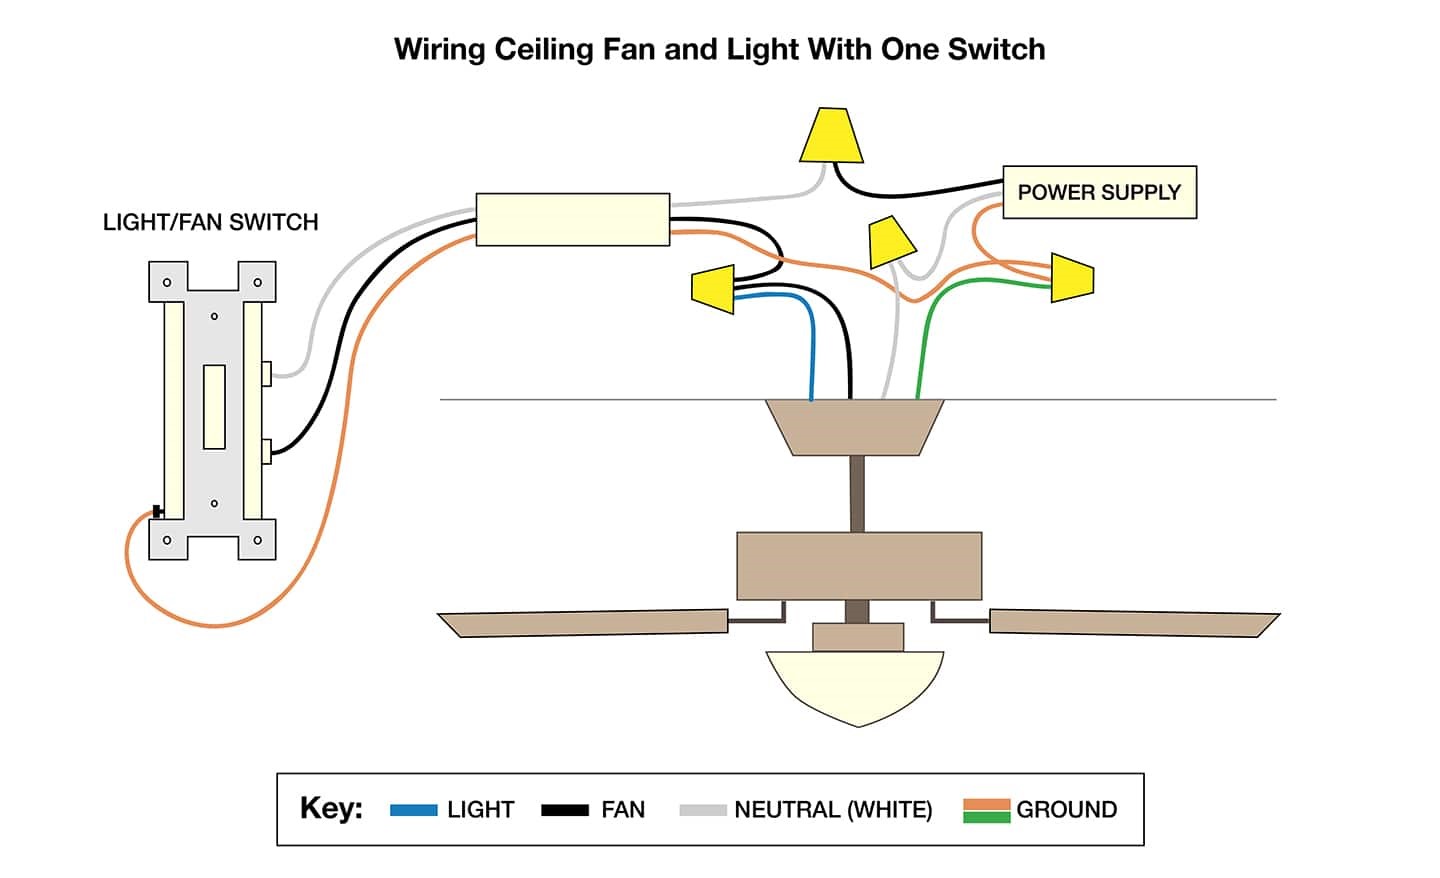
Single Switch Configuration
In a single switch configuration, both the fan and light are controlled by one switch. This is the simplest setup and is ideal for basic ceiling fan installations. It allows for straightforward operation, making it a popular choice for many homeowners. However, this configuration may limit flexibility, as both the fan and light must be turned on or off together.
Dual Switch Configuration
A dual switch configuration allows for separate control of the fan and light. This setup is more versatile, enabling users to operate the fan and light independently. For instance, you can turn on the fan without activating the light, which is particularly useful during the day when natural light is sufficient. This configuration often requires additional wiring, but the benefits in terms of convenience and functionality are significant.
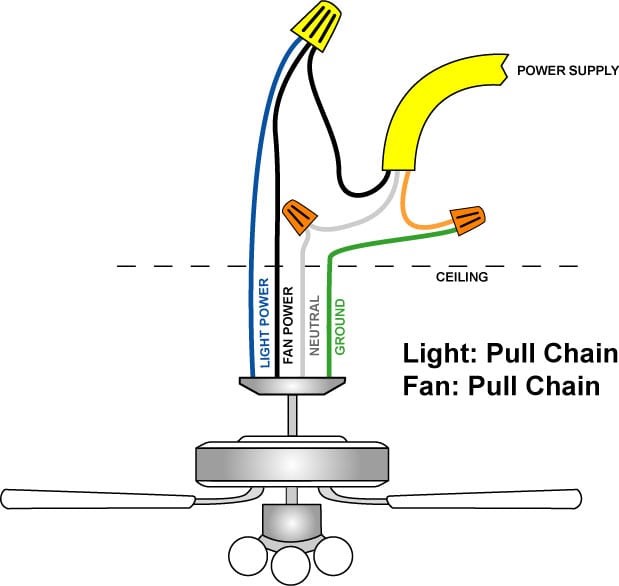
Remote Control Configuration
Many modern ceiling fans come with remote controls, which can simplify operation. In this case, the wiring may differ slightly, as the remote receiver is integrated into the fan’s electrical system. This configuration allows for easy adjustments to fan speed and light brightness from anywhere in the room, enhancing user comfort. Additionally, some remote controls offer programmable settings, allowing users to set timers or adjust the fan’s operation based on their preferences.
Reading a Ceiling Fan Wiring Diagram
When looking at a ceiling fan wiring diagram, you will notice various symbols and lines representing different components and connections. Here’s how to interpret these diagrams effectively:
Symbols Used in Wiring Diagrams
– Lines: Represent electrical wires. Different line styles may indicate different wire types (e.g., solid lines for hot wires, dashed lines for neutral). Understanding these distinctions is crucial for making the correct connections.
– Circles: Often represent junction boxes or connection points. These are critical areas where wires meet and must be securely connected to ensure proper functionality.
– Switch Symbols: Indicate where switches are located in the circuit. Recognizing these symbols helps you understand how to control the fan and light effectively.
Color Codes for Wiring
Understanding wire color codes is crucial for safe installation. Here are the standard color codes used in ceiling fan wiring:
– Black Wire: Hot wire, typically connected to the fan motor. This wire carries the electrical current necessary for the fan to operate.
– White Wire: Neutral wire, usually connected to the power supply. The neutral wire completes the electrical circuit, allowing current to return safely.
– Green or Bare Wire: Ground wire, essential for safety. This wire helps prevent electrical shock by providing a path for excess current to flow safely to the ground.
– Red Wire: Often used in dual switch configurations to control the light separately. This wire allows for independent operation of the light kit, enhancing the fan’s versatility.
Step-by-Step Guide to Wiring a Ceiling Fan
Now that you understand the components and how to read a wiring diagram, let’s go through the steps to wire a ceiling fan. Following these steps carefully will help ensure a safe and successful installation.
Step 1: Gather Your Tools and Materials
Before starting, ensure you have the necessary tools, including a voltage tester, wire strippers, and screwdrivers. You will also need electrical tape and wire nuts for secure connections. Having everything ready will streamline the installation process and minimize the risk of errors.
Step 2: Turn Off Power
Safety is paramount. Always turn off the power at the circuit breaker before beginning any electrical work. Use a voltage tester to confirm that the power is off. This step is crucial to prevent electrical shocks and ensure a safe working environment.
Step 3: Connect the Wires
Follow the wiring diagram closely. Connect the black wire from the ceiling to the black wire of the fan. Connect the white wires together, and attach the ground wires. If you have a light kit, connect the red wire to the light kit’s black wire. Taking your time during this step is essential to ensure that all connections are made correctly.
Step 4: Secure Connections
Use wire nuts to secure all connections, ensuring that no bare wire is exposed. Wrap electrical tape around the connections for added safety. Properly securing the connections helps prevent short circuits and ensures reliable operation of the fan and light.
Step 5: Mount the Fan
Once the wiring is complete, mount the fan to the ceiling bracket according to the manufacturer’s instructions. Ensure it is securely fastened. A well-mounted fan will operate more efficiently and reduce the risk of wobbling or falling.
Step 6: Restore Power and Test
After everything is connected and secured, restore power at the circuit breaker. Test the fan and light to ensure they operate correctly. If everything functions as expected, you can enjoy the benefits of your newly installed ceiling fan.
Safety Considerations When Wiring a Ceiling Fan
Wiring a ceiling fan involves working with electricity, which can be dangerous if not done correctly. Here are some safety tips to keep in mind:
– Always turn off the power before starting any electrical work. This is the most critical step in ensuring your safety.
– Use a voltage tester to ensure that wires are not live. This tool is essential for confirming that the power is off before you begin working.
– If you are unsure about any step, consult a professional electrician. It’s better to seek help than to risk injury or damage.
– Follow local electrical codes and regulations. Adhering to these guidelines ensures that your installation is safe and compliant with legal standards.
Troubleshooting Common Issues
Even with careful installation, issues can arise. Here are some common problems and their solutions:
Fan Does Not Turn On
If the fan does not operate, check the following:
– Ensure the power is on at the circuit breaker. Sometimes, the breaker may trip unexpectedly.
– Verify that all wire connections are secure. Loose connections can prevent the fan from receiving power.
– Test the switch to ensure it is functioning. A faulty switch can also be the culprit.
Light Does Not Work
If the light kit is not illuminating:
– Check the bulb to ensure it is not burned out. Replacing a bulb is a simple fix that can resolve the issue.
– Confirm that the wiring connections for the light kit are secure. Loose connections can prevent the light from receiving power.
– Test the switch controlling the light. If the switch is faulty, it may need to be replaced.
Fan Wobbles
A wobbly fan can be annoying and may indicate improper installation. To fix this:
– Ensure the fan is securely mounted to the ceiling. A loose mount can cause wobbling.
– Check that the blades are evenly spaced and not damaged. Uneven blades can lead to imbalance.
– Use a balancing kit if necessary to stabilize the fan. Many fans come with balancing kits that can help correct wobbling.
Conclusion
Understanding a ceiling fan electrical wiring diagram is essential for anyone looking to install or troubleshoot a ceiling fan. By familiarizing yourself with the components, wiring configurations, and safety considerations, you can confidently tackle your ceiling fan project. Whether you are a DIY enthusiast or a professional electrician, mastering these diagrams will enhance your skills and ensure successful installations. With the right knowledge and tools, you can enjoy the comfort and style that a ceiling fan brings to your home.
How To Purchase:https://looperbuy.com/search?keywords=ceiling+fan+electrical+wiring+diagram
Frequently Asked Questions
1.What tools do I need to install a ceiling fan?
You will need a voltage tester, wire strippers, screwdrivers, wire nuts, and electrical tape. Having the right tools will make the installation process smoother and more efficient.
2.Can I install a ceiling fan without a light kit?
Yes, ceiling fans can be installed without a light kit. Just follow the wiring diagram for a fan-only setup. This option is ideal for those who prefer a minimalist look or already have sufficient lighting in the room.
3.What should I do if my ceiling fan is making noise?
Check for loose screws, ensure the blades are balanced, and verify that the fan is securely mounted. Noise can often be resolved by tightening screws or adjusting the blade alignment.
4.Is it safe to install a ceiling fan myself?
If you are comfortable working with electricity and follow safety guidelines, it can be safe. Otherwise, consider hiring a professional. Always prioritize safety and consult an expert if you have any doubts.
5.How do I know if my ceiling fan is compatible with a remote control?
Check the manufacturer’s specifications or the wiring diagram to see if a remote control option is available for your fan model. Many modern fans are designed to be compatible with remote controls, enhancing convenience and usability.